Description
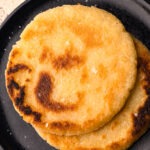
Arepas, a flat corn cake made from a special type of cornmeal, are a staple in many Latin-American cultures. They are crispy, savory and the perfect side dish to serve up for any meal of the day.
Ingredients
- 2 cups (452 grams) warm water
- 2 tablespoons unsalted butter, softened
- 2 teaspoons coarse kosher salt
- 1 teaspoon granulated sugar
- 1-1/2 cups (240 grams) masa arepa (see note)
- 1 tablespoon avocado oil or other high-heat oil, more as needed
Instructions
- Cut twelve 4-inch squares of parchment paper.
- In a bowl, stir together the warm water, softened butter, salt and sugar until the butter is mostly melted.
- Add in the masa arepa and stir with a wooden spoon or rubber spatula until fully combined.
- Let the dough sit for 3 minutes to fully hydrate. It should be the consistency of playdough. It should be soft but not so wet that it sticks to your fingers. If the dough is too wet, add more masa, a tablespoon at a time, until it reaches a soft, non-sticky texture. If it’s too stiff, add more warm water a tablespoon at a time until it’s a soft, non-sticky consistency.
- Portion the dough into roughly ten ¼-cup portions.
- Working one at a time, pat each ball between your hands to make a flat cake, about 3-inches wide and ½-inch thick. To even out the edges, roll the arepa on a hard surface. Or, use a tortilla press or a plastic bag and a cutting board to manually flatten the arepas: Cut a large plastic bag (like a freezer bag) into two squares (these plastic pieces will prevent the dough from sticking to the press). Place one of the plastic pieces on a sturdy flat surface (or the tortilla press). Place a dough ball in the center of the plastic, then cover it with the second plastic square. Use a cutting board (or tortilla press) push down with firm, even pressure to flatten the dough until it’s about ½-inch thick, or your desired thickness.
- Place the arepa on a square of parchment paper on a plate.
- Moving quickly (so the dough doesn’t dry out) repeat shaping the remaining arepas, stacking the formed arepas on top of one another with a piece of parchment in between.
- Heat a large, heavy skillet over medium heat. Once hot, add the oil. Place as many arepas in the pan as can fit in an even layer. Cook until lightly golden on the bottom, 5 to 7 minutes. Moderate the heat as needed.
- Flip and cook for an additional 3 to 5 minutes, or until the arepas are golden on both sides. Remove from the pan, and repeat with any remaining arepas.
- Serve immediately.
Notes
Masa arepa is not interchangeable with any other masa or flour, such as masa harina. I recommend PAN brand.
The dough should be soft, like play dough, but it shouldn't be so wet that it sticks to your hand. After the dough has rested, pick it up and see if it's still very sticky. If it's too sticky, add in 1 tablespoon more masa at a time until the dough is just dry enough. The dough is more likely to be too wet than too dry, but it can be too dry. If you haven't added enough water, the dough will easily crack as you form it into its shape. In this instance, add 1 tablespoon of water at a time until the dough forms into an arepa without cracks.
The arepas can be prepped ahead of time and stored uncooked. Form the arepas, then sandwich them between pieces of parchment paper. Place in a container with a dry cotton towel over the top. These pre-formed arepas can be stored in the refrigerator for several days. When you're ready to enjoy them, simply heat up the pan and cook the arepas as directed, with a slight increase in cooking time to ensure they're heated through. It's a convenient way to have freshly cooked arepas for breakfast without the hassle of forming them each time!
Arepas are made in all shapes in sizes. They can also be stuffed before and after they are cooked. If you want to make arepas to turn into sandwiches, make them on the larger size, about 4-inches wide by ¾ to 1-inch thick. They will take significantly longer to cook through, closer to 10 minutes per side. Let them cool before slicing open and stuffing with your filling of choice. In our family, we love to stuff them with shredded meat, avocado, cheese and aji.
This recipe was tested using Diamond Crystal coarse kosher salt. If you use Morton's kosher salt or fine salt, decrease the volume by half.